Tutorials
Andorra 2D tutorials
Part 2 - The first graphic
Introduction
In the last tutorial you have learned how to initialise Andorra 2D. The result was a black window. However, we could have achieved this with much less effort. Therefore we now continue with our sample programme - we load an image and display it.
The image list
What we need first of all is a so-called "ImageList", which conveniently stores all images that have been loaded into it.
Now we need a variable of the type "TAdImageList" which we call "AdImageList" and create in FormCreate. Note that the list may only be created after calling AdDraw.Initialize. So we continue writing below the line "Application.OnIdle := Idle":
AdImageList := TAdImageList.Create(AdDraw);
Now we want to add a image to the list. This is done by the following code:
with AdImageList.Add('image') do //A image called 'image' is added to the list.
begin
  Texture.LoadGraphicFromFile('texture.bmp'); //A image is loaded into the texture
end;
AdImageList.Restore; //To be explained later
The Imagelist's function "Add" adds a image of the type "TAdImage" with the corresponding name and returns it.
Why does this "TAdImage" now have a sub-object "Texture" again? Are an image and a texture not the same? As the following picture shows, this is not quite true in Andorra2D...
The image, the object we just added to the image list, that is, is merely some kind of base frame on which the texture is painted. So the "Image" or "Picture" is just a canvas whereas the texture is what is painted on it.
Now another uncertainty has to be clarified: The job of the procedure "Restore". When the image list's function "Restore" is being called, it just calls the "Restore" function of each image. Therefore the following code would do the same:
with AdImageList.Add('image') do //An image called 'image' is added to the list.
begin
  Texture.LoadGraphicFromFile('texture.bmp',false,clNone); //A texture is loaded into the image without transparency.
  Restore;
end;
However, this method is somewhat laborious when many entries are added to the image list.
Now it only has to be said what this "Restore" does. Let us remember the image mentioned earlier: The image is just the base frame on which the texture is painted. Now the base frame cannot know the size of the texture we loaded. Therefore the base frame is recreated with the appropriate size when the function "Restore" is called and according links are placed. When one forgets calling "Restore", an error message is the most likely result.
Loading the images
The texture provides the following procedure to load and save images:
procedure LoadFromStream(AStream:TStream);
procedure SaveToStream(AStream:TStream);
procedure SaveToFile(AFile:string);
procedure LoadFromFile(AFile:string);
procedure LoadGraphicFromFile(AFile:string;Transparent:boolean;TransparentColor:TColor);
procedure LoadFromGraphic(AGraphic:TGraphic);
Only the last two methods are relevant for loading graphics directly. The first few write the texture in a file format of Andorra 2D and are not suitable for loading "normal" graphic files.
"LoadFromGraphic" gets the transparency parameters directly from the loaded graphic. By default, Andorra 2D can load all standard graphics formats of the VCL - *.bmp (BItmap), *.dib (Device Independend Bitmap) and *.wmf (Windows Meta File). To load other formats, appropriate loader libraries have to be added to the uses clause. These libraries add themselves to a list on initialisation. Andorra 2D can then load these formats and (if implemented accordingly) save them, too. To load PNG images, the unit "AdPNG" has to be added to the uses clause. Wrapper units for "DevIL" and "FreeImage" are also available. These libraries have to be installed independently from Andorra 2D. For the PNG format the library "PNGDelphi" (http://pngdelphi.sourceforge.net/) is needed.
Rise the curtain
Now we are only a small step away from displaying our first image on the screen. The following line, which we add to the procedure "Idle" between "BeginScene" and "EndScene", does this.
AdImageList.Find('image').Draw(AdDraw,0,0,0);
Now what do these four parameters of the procedure "Draw" mean? Here AdDraw is the so-called "surface" which is the image is painted on. The next two parameters specify the position on the screen, at which the image is to be painted. The third parameters specifies the so-called "PatternIndex", which handles animations, of which more later.
Now there is not only the function "Draw" alone to draw images, this would be fairly little. The TAdImage object also provides these other procedures:
add
//Simplest method for drawing
procedure Draw(Dest:TAdDraw;X,Y,PatternIndex:integer);
//Draw an image stretched
procedure StretchDraw(Dest:TAdDraw;const DestRect:TAdRect;PatternIndex:integer);
//Draw an image stretched and with a certain alpha value (from 0 like fully transparent to 255 like completely opaque)
procedure DrawAlpha(Dest: TAdDraw; const DestRect: TAdRect; PatternIndex: Integer; Alpha: Integer);
//Draw an image stretched with additive colour blend and a certain alpha value (from 0 like fully transparent to 255 like completely opaque)
procedure DrawAdd(Dest: TAdDraw; const DestRect: TAdRect; PatternIndex: Integer; Alpha: Integer);
//Draw a stretched image completely black and with a certain alpha value (from 0 like fully transparent to 255 like completely opaque)
procedure DrawMask(Dest: TAdDraw; const DestRect: TAdRect; PatternIndex: Integer; Alpha: Integer);
//Draw an image rotated. Angle is a value from 0 to 360 degrees. CenterX and CenterY denote the centre of the rotation. The two values range from 0 to 1, so 0.5 and 0.5 are exactly the centre of an image.
procedure DrawRotate(Dest: TAdDraw; X, Y, Width, Height: Integer; PatternIndex: Integer; CenterX, CenterY: Double; Angle: Integer);
procedure DrawRotateAdd(Dest: TAdDraw; X, Y, Width, Height: Integer; PatternIndex: Integer; CenterX, CenterY: Double; Angle: Integer; Alpha: Integer);
procedure DrawRotateAlpha(Dest: TAdDraw; X, Y, Width, Height: Integer; PatternIndex: Integer; CenterX, CenterY: Double; Angle: Integer; Alpha: Integer);
procedure DrawRotateMask(Dest: TAdDraw; X, Y, Width, Height: Integer; PatternIndex: Integer; CenterX, CenterY: Double; Angle: Integer; Alpha: Integer);
//Similar to StretchBlt from the Windows GDI. Draws a certain part of the image magnified or downscaled.
procedure DrawEx(Dest:TAdDraw; SourceRect,DestRect:TAdRect;CenterX,CenterY:integer;Angle:Integer;Alpha:Integer;BlendMode:TAd2dBlendMode);
A more detailed description can be found in the documentation:
http://andorra.sourceforge.net/docs/AdDraws.TAdCustomImage.html
You best try these methods on our sample image. However, I will explain some of them in the tutorials. As you might have noticed, Andorra 2D uses its own types such as "TAdRect", which are located in the unit "AdTypes". Therefore the VCL unit "Types" and "Windows" do not have to be used.
Fullscreen
Many games run fullscreen. You can also easily set it up in Andorra 2D. FOr this you only have to navigate to the "OnCreate" method of Form1. Add the following lines before "AdDraw.Initialize":
with AdDraw.Display do
begin
  Width := 800;
  Height := 600;
  BitDepth := ad32Bit; //The colour depth. The values "ad16Bit" and "ad32Bit" are allowed here.
  DisplayMode := dmFullscreen;
end;
Note that the graphic output of the AdDraw has to be on a TForm or the fullscreen display will not work.
And now your Andorra 2D application already runs fullscreen. However, you have to ensure that both your monitor and your graphics card support the specified resolution. There is a minor trick with which you can achieve fullscreen without having to change the resolution. Instead of the above lines just write:
BorderStyle := bsNone;
Top := 0;
Left := 0;
Width := Screen.Width;
Height := Screen.Height;
With this only the size of your form is changed.
Important: With the first method, it is tried to run the programme in a real overlay fullscreen mode. This means that the graphics output is a great deal faster because control elements of other applications are not drawn anymore. With the second method the window only covers all the others, so not as many FPS can be reached.
Movements and animations
You best delete all changes from the programme which you have made in this tutorial thus far.
Now we want to have an animated figure run across the screen. As soon as it has reached one edge of the screen, it should run back on an arbitrary Y position.
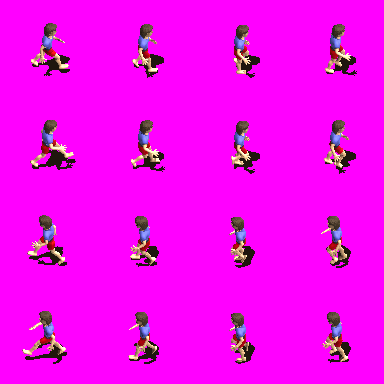
For this we first need the image of the animated figure - which looks like this:
As we see, this image is effectively constructed like a filmstrip. To show a part of the animated, only a part of the texture is drawn.
You might wonder why we don't have a separate image file for each step of the animation now, (also called frame or pattern) but this would simply be inefficient because it is better for the graphics card to manage one texture the size of 512x512 than many small ones the size of 128x128.
The image of the figure can be downloaded here. By the way, it originates from Reiner's Tilesets. You can find many figures, objects and a lot more for use in 2D games there.
First we have to load the image with the animations into the engine. This is done almost like we did before:
AdImageList := TAdImageList.Create(AdDraw);
with AdImageList.Add('figure') do
begin
  Texture.LoadGraphicFromFile('boy.bmp',true,clFuchsia);  //This time the image is loaded transparently
  PatternWidth := 96;
  PatternHeight := 96;
end;
AdImageList.Restore;
With PatternWidth and PatternHeight the height and width of a frame are set, in our case to 96. By calling the "Restore" instruction, Andorra 2D creates some kind of map on which stores the number and position of each frame. In fact, Andorra counts from left to right and then from up to down. Also, the numbering starts from zero, as shown on the picture above.
If you now want to draw a single frame from the animation, the "PatternIndex" of the drawing function comes into play. Here you can simply specify the number of the frame and it is drawn.
But we wanted to have the figure run across the screen, so we take care of the animation first. For this we need a variable of the type Single or Double. You will see later why it cannot just be a simple Integer. So we add a variable "Pattern" to the variable declarations in the interface clause of the programme so that the line looks vaguely like this:
var
  Form1: TForm1;
  Pattern:single;
In "Idle" we now increment Pattern in each step and redraw the figure afterwards. We also have to check if the pattern exceeds the pattern number as the case may be and reset it to zero if it does.
Pattern := Pattern + 1;
if Pattern >= AdImageList.Items[0].PatternCount-1 then Pattern := 0;
AdImageList.Items[0].Draw(AdDraw,0,0,round(Pattern));
However, upon executing one can see that the animations happens far too fast. The rendering loop is executed up to 5000 times in a second and the pattern is therefore incremented by 5000. Of course, instead of +1 we could now write +0.001, for example, which would cause the animation to run more slowly. However, we then have to problem addressed in the first tutorial, the animation does not run at the same speed on every PC. To avoid this problem, there is another object in Andorra 2D: The so-called "TAdPerformanceCounter" which can be found in the unit "AdPerformanceCounter". So we declare a new variable of the type "TAdPerformanceCounter" called "AdPerCounter", create an instance of the class in "FormCreate" and free it again in FormDestroy as we have done it with all the other objects, too.
We now write "AdPerCounter.Calculate" fairly at the beginning of the "Idle" procedure. With this, the object calculates the lapse of time between procedure runs, apart from that the well-known FPS (frames per second), which you might know from some games and which are an importand performance indicator, are calculated. With the elapsed time in milliseconds, which is stored in the variable "AdPerCounter.TimeGap", we can now create an animation which runs at the same speed on almost all PCs in the world, like this:
AdPerCounter.Calculate;
Pattern := Pattern + 15 * (AdPerCounter.TimeGap / 1000);
15 is the number of frames per second with which the animation runs here. Upon executing the animation should now run nicely slowly and at an equal speed on every computer.
It was our goal to move the figure across the screen. But apart from being animated nicely now, it lacks movement. Now we first need a handful of new variables, which we declare near the others:
StartPt,EndPt:integer; //The animation's start and end pattern
Y,X:single; //The figures X and Y position
XSpeed:single; //The velocity in X direction
To move the figure we have to extend the "Draw" routine a bit.
AdImageList.Find('figure').Draw(AdDraw,round(X),round(Y),round(Pattern));
Now the figure is drawn at the position X and Y. To move it, we write the following above the drawing function:
X := X + XSpeed * (AdPerCounter.TimeGap / 1000);
Furthermore the animation should only range from "StartPt" to "EndPt", which is why we modify the if statement a bit:
if Pattern >= EndPt then Pattern := StartPt;
Now we just need a procedure to handle the figure's change of direction. We call it "SetLine", because the figure's Y position is also changed. "SetLine" should be declared within TForm1.
procedure TForm1.SetLine;
begin
  //Reverse the direction
  XSpeed := -XSpeed;

  if XSpeed > 0 then
  begin
    StartPt := 0;
    EndPt := 7;
    X := -96;
  end
  else
  begin
    StartPt := 8;
    EndPt := 15;
    X := ClientWidth+96;
  end;

  //Set the Y position
  Y := Random(ClientHeight-96);
end;
Apart from that we need the following line in the "Idle" procedure to call the procedure when the figure leaves the edge of the screen:
if ((X > ClientWidth) and (XSpeed > 0)) or
   ((X < -96) and (XSpeed < 0)) then SetLine;
Now we only have to set the XSpeed and call the procedure "SetLine" for the first time in "FormCreate":
XSpeed := -150;
SetLine;
And now our figure runs across the screen upon execution.
The source code
As always, the source code as a reference:
unit Main;
interface
uses
  Windows, Dialogs, SysUtils, Graphics, Classes, Forms, AdDraws, AdClasses, AdTypes,
  AdPerformanceCounter;
type
  TForm1 = class(TForm)
    procedure FormCreate(Sender: TObject);
    procedure FormDestroy(Sender: TObject);
    procedure FormResize(Sender: TObject);
  private
    { Private-Deklarationen }
  public
    AdDraw:TAdDraw;
    AdPerCounter:TAdPerformanceCounter;
    AdImageList:TAdImageList;
    procedure Idle(Sender:TObject;var Done:boolean);
    procedure SetLine;
    { Public-Deklarationen }
  end;
var
  Form1: TForm1;
  Pattern:single;
  StartPt,EndPt:integer;
  Y,X:single;
  XSpeed:single;
implementation
{$R *.dfm}
procedure TForm1.SetLine;
begin
  XSpeed := -XSpeed;
  if XSpeed > 0 then
  begin
    StartPt := 0;
    EndPt := 7;
    X := -96;
  end
  else
  begin
    StartPt := 8;
    EndPt := 15;
    X := ClientWidth+96;
  end;
  Y := Random(ClientHeight-96);
end;
procedure TForm1.FormCreate(Sender: TObject);
begin
  ReportMemoryLeaksOnShutdown := true;
  AdPerCounter := TPerformanceCounter.Create;
  AdDraw := TAdDraw.Create(self);
  AdDraw.DllName := 'AndorraDX93D.dll';
  if AdDraw.Initialize then
  begin
    Application.OnIdle := Idle;
    AdImageList := TAdImageList.Create(AdDraw);
    with AdImageList.Add('figure') do
    begin
      Texture.LoadGraphicFromFile('boy.bmp',true,clFuchsia);
      PatternWidth := 96;
      PatternHeight := 96;
    end;
    AdImageList.Restore;
XSpeed := -150;
    Randomize;
    SetLine;
  end
  else
  begin
    ShowMessage('Error while initializing Andorra 2D. Try to use another display '+
                'mode or another video adapter.');
    Close;
  end;
end;
procedure TForm1.FormDestroy(Sender: TObject);
begin
  AdImageList.Free;
  AdPerCounter.Free;
  AdDraw.Free;
end;
procedure TForm1.Idle(Sender: TObject; var Done: boolean);
begin
  if AdDraw.CanDraw then
  begin
    AdPerCounter.Calculate;
    Caption := 'FPS:'+inttostr(AdPerCounter.FPS);
    Pattern := Pattern + 15*AdPerCounter.TimeGap/1000;
    if Pattern >= EndPt then Pattern := StartPt;
    X := X + XSpeed*AdPerCounter.TimeGap/1000;
    if ((X > ClientWidth) and (XSpeed > 0)) or
       ((X < -96) and (XSpeed < 0)) then SetLine;
    AdDraw.ClearSurface(clBlack);
    AdDraw.BeginScene;
    AdImageList.Find('figure').Draw(AdDraw, round(X), round(Y), round(Pattern));
    AdDraw.EndScene;
    AdDraw.Flip;
    Done := false;
  end;
end;
end.
Conclusion
Now we already have created an animated figure, but the whole thing still was fairly pedestrian. Because of that we will take a look at the a solution integrated into Andorra 2D in the following tutorials: The so-called SpriteEngine. With its help one can programme all kinds of games without much effort.
Copyright and licence
(c) by Andreas St�ckel January 2007
Translation by 3_of_8 (Manuel Eberl)
Revision 2: October 2007
Revision 3: December 2007
The content of this tutorial is subject to the GNU Licence for free documentation.
This page was generated with the help of the following PHP-Scripts: GeSHi a free PHP Syntax highlighter and StringParser_BBCode a free BBCode Parser.